
It is funny that many of my ideas come to me whilst I am on the toilet. This one is no exception. In this project I will show you how to compose WAV audio files on your computer, then blow them to an EPROM that can be read using a simple pocket-sized CMOS reader. Unfortunately this project means that I need to explain loads of data about Micro$oft .BIN and .WAV files.
The electronics is ridiculously simple and the speech quality from this project is surprisingly clear, far better than the proverbial "BBC Quality" (I listen to the BBC World Service daily and I think that "BBC quality" on HF is crap!!). The unit I will describe is far in advance of those little "fart machines" or "laughing boxes" that seem to be quite popular as presents this Christmas.
You will be able to record two seconds of decent quality AF on a 2764 EPROM, with a 4KHz sample rate. You can double this to four seconds if you drop the sample rate to 2KHz, which is the point at which noticeable distortion begins to appear. A 27256 will give you eight seconds at 4KHz sample rate and 16 seconds at half-rate. I only need 2 seconds to say "ESS EMM ZERO VEE PEE OH". If you want to recite 'War & Peace' then you will need a few hard disks. I am presently looking into a bit of logic that can read data from those old obsolete 40M/byte and 120M/byte hard disks that you have probably got lying around.
All I use is my own homebrew EPROM programmer E-EDIT software to blow the final EPROMS. I have some "offset" functions that allow you to burn an EPROM starting from a specific RAM address and to burn the EPROM from a specific address. My program may be quite crude, but it works, and such features are not found on many commercial EPROM burners.
SoundForge (or any good sound editor program) to create and edit the final WAV sound file, but you can use the WINDOZE program SOUND RECORDER from your accessories package. The functions are crap, but it works. Alternatively you can use just about any .WAV editing program, as long as you can choose your own sampling frequency. The sampling frequency is the clock speed you will need in the homebrew hardware. Too fast and a simple EPROM will only hold a couple of milliseconds of audio. Too slow and it will sound crappy, just like those "fart machines" you get from the toy shop. A compression facility is also helpfull to keep the AF level high but without distortion.
DISKEDIT.EXE (an old DOS program) to view and edit binary files. You may use any old binary editor, as long as you can view the files in HEX format. I have succesfully used NOTEPAD.EXE to edit the files, but there are viewing problems and you have to count the characters very accurately.
I don't mean to teach my grandmother how to suck eggs, but this does require a little thought. Plug a microphone into your computer and record the WAV file in the normal way. You must finish with a MONO and 4KHz (or 2KHz) sample rate file and only 8 bit interpolation. You may like to record using 16-bit resolution, 44100Hz sampling frequency.
The next thing to do to the file is to add compression, where peaks are attenuated, but low-level signals remain unchanged. In SoundForge you highlight the whole track, select OPTIONS the DYNAMICS. Using Samplitude you highlight the whole track, right-click and select EFFECTS then COMPRESS. If you do not compress then signals have a tendency to be low level, which could sound a little distorted when you listen very closely.
Now NORMALIZE the file to 98%. In SoundForge you highlight the whole file, and select NORMALIZE from the PROCESS pull-down menu. In Samplitude you highlight the whole file, right-click and select NORMALIZE from the EFFECTS menu. Do NOT normalize to 100% if you want the hardware to detect the end of the file. I didn't bother with the examples here, mainly because I wanted clean numbers.
Finally process the file: convert to 8-bit and resample to 2Kb/s. This will give you the best possible audio quality. This should be done BEFORE the compression and normalising stages or distortion could creep in. If you now listen to the WAV file you will hear the final quality.
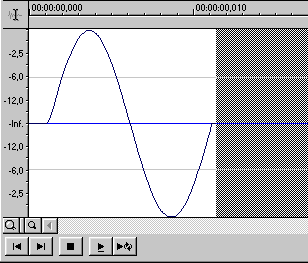
If you are with me so far, then you have created a high-volume compressed audio file. You are now ready to create a BINARY file that can be read by an EPROM burner program. For this article I have created a short file that will fit on a single page - one cycle of 100Hz tone, called SOUND1.WAV.
This is where I feel a bit of a cheat. If you followed the above steps you will already have the file in BINARY format, you just don't know it! Now rename the file SOUND1.WAV to SOUND1.BIN and examine it with a HEX editor. You can VIEW hexadecimal files using Norton Commander, just select OPTIONS and tick HEX. The file should look something like this:
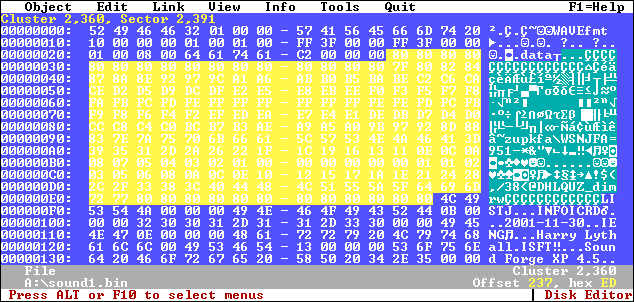
The yellow highlighted area is the audio data, which begins 80 80 80. 80 is half of FF which represents zero-volts in the AF waveform. You can see that the data continues from 80 80 80, up to almost FF, down to 80 again, then continues to almost 00 before finally returning to 80. This is our one cycle. It always starts at the HEX address 002C.
Look at the four bytes before the data - C2 00 00 00. This is the total number of bytes of data for the waveform and this is the amount of data that must be burnt into the EPROM, as shown below. 2C is the least significant byte of the four.

It is well worthwhile dwelling on the datalength bytes for a moment, the hexadecimal numbers must be understood to blow the EPROM. Take for example the hexadecimal number 87654321, this would appear in the file as 21 43 65 87.
The next byte of interest in the .WAV file is the sampling rate. This information is to be found here, in yellow: It is FF 3F 00 00 which corresponds to a sample rate of 00003FFF. In this particular case the sample rate 3FFF hex is 16K decimal (16,383 bytes/second).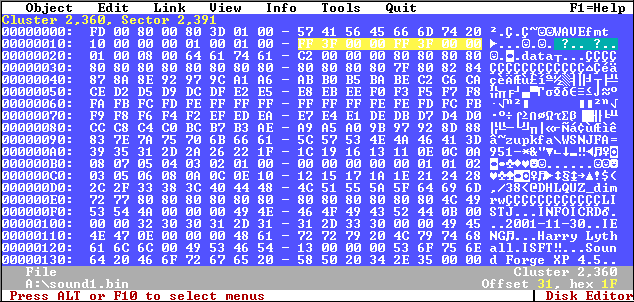
Again, the hexadecimal number 87654321, this would appear in the file as 21 43 65 87. You will note that the information is duplicated. Why? I have not got a clue. If you wanted to convert hexadecimal numbers to decimal, and the other way around, then use the calculator in the WINDOZE ACCESORIES page. Just change the option to SCIENTIFIC then you can enter a number and click on the HEX tab to convert.
Now we need to convert the complete file to .BIN format, so change the first few numbers in the file. If it were still a .WAV file then the eight characters would have been "52 49 46 46 32 01 00 00". The sequence 32 01 00 00 is the total file length, with the bytes in reverse order. The total .WAV file length was therefore 00000132 Hex = 306 bytes decimal plus the eight header bytes = 314 bytes.
In the last example I have already changed them to "FD 00 80 00 80 3D 01 00" which is the header for a MICRO$OFT .BIN file having the file length of 00013D characters. The FD 00 80 00 80 is always the same for the .BIN file and the 00013D I took as the address at the end of the file. Look at the line that begins with the address 00000130: and you see that there is a 00 at 00013E. Now that I have changed these bytes I can open the new .BIN file with my E-EDIT.EXE program, or any BASIC program, such as GW-BASIC.EXE, Q-BASIC.EXE or TB.EXE.
Now we are in a position to burn the EPROM. When EEDIT.EXE asks for a buffer offset, enter the HEX value 0024 and the file length 00C2. That's it! If you wanted to use a burn program that saves in "raw binary" then the program igniores even the first eight bytes, so the burn offset would be 002C HEX, or 44 Decimal. It may seem a bit complicated, but read it through a couple of times and I am sure you will get the right idea.
Next, we need some hardware that can read the EPROM data and output an audio waveform.
Again, I feel like a bit of a cheat. The hardware is not new, in fact it is based upon the same hardware that I used for the EPROM AF generator project. The only difference is that this time we use two counter chips (CD4040) to address the whole of the EPROM chip in one big chunk. I have not given the EPROM pinouts since they will vary, depending upon the EPROM you want to use. It should be possible to have just one 32-pin socket and plug in just about any EPROM you want (except a 2708).
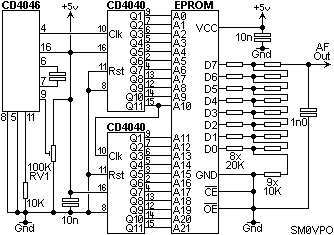
Here we have a simple oscillator. I have used a CD4046 but only the VCO section. The chip is cheap enough, but it gives the possibility to use RV1 to set the sample rate. The sample rate is variable from 100Hz to 4KHz, which should cover just about any rate you want. The two CD4040 chips divide the oscillator output and give a long, many-digit binary address that can address the whole of every EPROM that is presently on the market today.
The DATA output pins (D0 - D7) of the EPROM are connected to a simple R2R ladder arrangement to give an analogue representation of the data contained in the EPROM. This is the speech output. Here you could use a simple Op-Amp (741) to buffer the audio, or maybe a high-impedance loudspeaker (80-Ohms?). An LM380 would drive a decent loudspeaker.
The circuit, as shown, will repeat over and over again the same sound, endlessly. It gets a bit boring after a minute or so, so you may wish to add some form of "play once" circuit. This is best achieved by adding a NAND gate between the counter and the CD4040 divider chain.
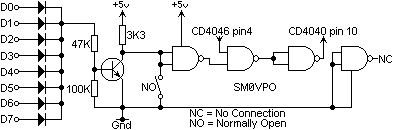
A unique number contained in the EPROM is used to stop the counter at the end of the data. "00" is a good number to use, but it means that the audio signal shall be normailsed to 98% and NOT 100%. In this way, every byte of audio will be non-zero. Reseting the counters (CD4040 pin 11) will start the playback from the beginning. The switch in the stop circuit allows continuous looped playing of your sound.
So now you have some more "grist for the mill", if you too feel like experimenting then I am sure you will be able to teach me something. One thing this project proves is that there is little new technology, just developments of old ones!
Best regards from Harry - SM0VPO
Return to INFO page